As of late, Google declared that they are shutting new information exchanges for the free form of Google Apps suite, which had Google Apps with Gmail on custom area names. A great deal of our clients inquired as to whether there was a free option. Outlook.com is a free email benefit propelled by Microsoft which you can use with your own area name. Joining Outlook.com with Microsoft Skydrive's free close to home stockpiling, Outlook.com can be exceptionally valuable for experts and site proprietors. In this article, we will demonstrate to you proper methodologies to set up your own proficient marked email address with Outlook.com
Refresh: We firmly prescribe utilizing Google Apps for making your uniquely marked email address. That is the thing that we use for our messages, and we feel certain prescribing the Google Suite. See our guide on the most proficient method to setup an expert email address with Google Apps and Gmail.
What is a Professional Email?
An expert email is the one that has your business name in it. For instance support@yourdomain.com is an expert email rather having yourdomain@yahoo.com. There are numerous ways you can setup an expert email. You can utilize the inherent mail server that accompanies most WordPress web facilitating suppliers. In any case, that does not almost coordinate to the highlights you get with Gmail.
Well ordered Guide to Setting up Outlook.com on a Custom Domain Name
Keeping in mind the end goal to utilize Outlook all alone custom space, you have to arrange your area's MX and TXT Records. MX records tell area name servers that you are utilizing Microsoft mail servers, and TXT records will be utilized to check your responsibility for space.
Stage 1: Signing up for a Custom Domain Mail Service
Go to Windows Live Admin Center and tap on Get Started to begin setting up your area on Outlook.com.
Enter your area name on the following page:

The next screen will give you a choice to either use an existing Microsoft account to administer this domain or create a new Microsoft account on your own domain name, e.g. yourname@yourdomain.com. Make sure that you give an active email address as Microsoft will send a verification email to verify your ownership of the email address.

If you opted to use an existing Microsoft account then you will be asked to sign in, otherwise you will have to fill a form to set up a new account on your custom domain. Once you fill out the form, you will receive a verification email at the email address you provided. Click the link in the email to verify your ownership of the email account.

The next page will ask you to confirm your request and accept Microsoft’s terms of service. Once you accept, you have finished the first step of setting up an administrator email account to manage your domain on Outlook.com
Step 2: Setting up DNS MX Records to use Hotmail.com sign in
After the registration, you will reach Windows Live Admin Center’s domain control page and it will be showing MX and TXT record strings which you need to add to your DNS settings.
Many WordPress hosting providers use cpanel for account management. It is likely that your web host may be using a different control panel with a slightly different interface. Don’t worry just look around for Domain Settings page, and you will find a link to edit the DNS settings or enter MX records. If you can’t find DNS or MX records settings in your control panel, then ask your web host. In this tutorial we will be using cpanel to demonstrate how to add MX records.
Log in to cpanel and click on MX Entry icon under Mail:

Select a domain name:

After this you need to select email routing method. Choose “Automatically detect configuration”.

Add the MX record string provided by Outlook.com. Leave priority as it is and add the record in the Destination field.

To protect email originating from your domain and landing into junk or spam, you need to configure sender ID by adding a TXT record with this value:
v=spf1 include:hotmail.com ~all
If you want users to use mail.yourdomain.com to sign in for email address, then you can create a CNAME record in your domain’s custom DNS settings or in cpanel’s Simple DNS Editor. Enter Mail in the Name field, and enter subdomain in CNAME field, e.g. mail.example.com.

You will have to wait for DNS settings to propagate which can take 30 minutes to 48 hours. You can refresh Windows Live Admin center’s domain settings page to see when the changes are live and ready.

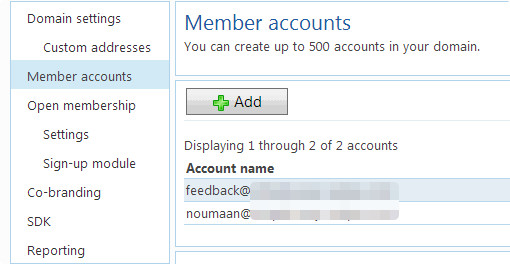
Step 3: Creating Custom Domain Name Email Accounts
Go to Windows Live Admin Center and click on your active domain. On the left sidebar you will find options to manage accounts on your domain. You can choose Open Membership, so that people on your site can signup for an email account with your domain name. The other option is where you manually create email accounts for your staff, family members, friends or community members. You have the power to suspend or delete any email account on your domain at any time.
Microsoft’s new Outlook.com email service looks very promising, and it is a great option for those who are searching for a free alternative to Gogole Apps. Let us know if you have any questions and concerns regarding this Outlook.com setup.
Không có nhận xét nào:
Đăng nhận xét